

A Vertical Polarizing Filter Is Used On The Lens Of A Camera. Which Waves Do Not Strike The Lens?
A polarizing filter is one of the well-nigh essential tools in a lensman'south pocketbook. It is typically the first filter landscape photographers buy to instantly amend their pictures by adding vividness and contrast to them. Putting a polarizing filter on your lens is similar wearing a pair of polarized sunglasses over your eyes – the polarized glass blocks random low-cal waves from passing through, creating a clearer image. In this article, we volition get through detailed data on polarizing filters, what they exercise, why they are important, and why y'all should consider using them for your photography needs.
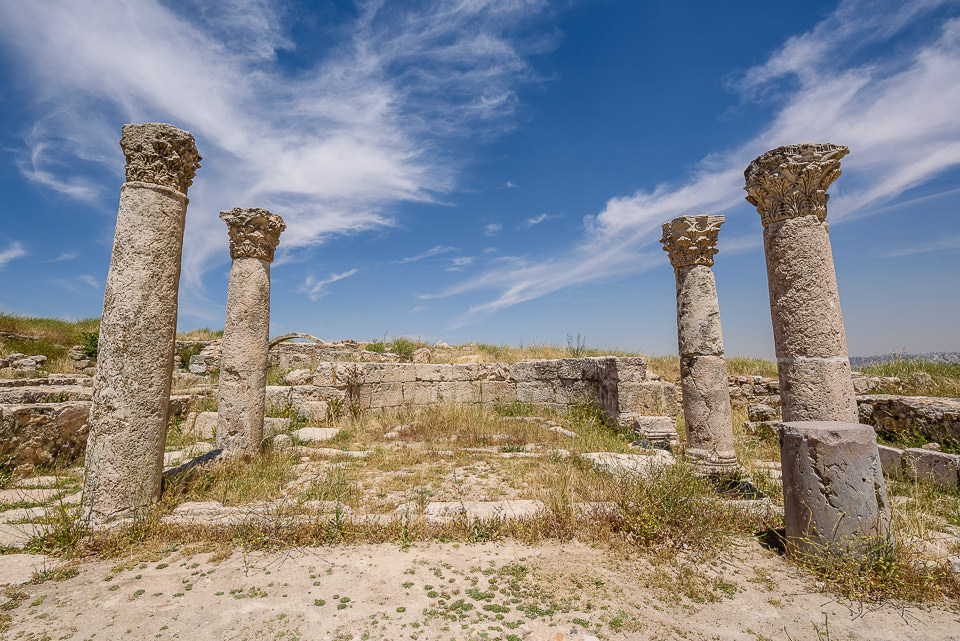
Fujifilm X-E1 + Zeiss Touit 12mm f/2.8 @ ISO 200, i/105, f/5.6
What is a Polarizing Filter?
A polarizing filter, also known as a "polarizer", is a photographic filter that is typically used in forepart of a photographic camera lens in order to reduce reflections, reduce atmospheric haze and increment color saturation in images. It is a pop filter among landscape, cityscape and architecture photographers, although it is unremarkably used for other types of photography likewise.

How Polarizing Filters Work
The vast majority of our planet'due south temper is equanimous of gases that are invisible to the man center. However, a minor portion of the atmosphere is made upward of water vapor, pollutants, and other particulate matter. These elements vary in quantity depending on the weather, time of twenty-four hours, and location. H2o vapor and pollutants contribute to brume, which decreases visibility over long distances, specially close to bodies of water. The haze we meet is a result of light waves striking particles in the air, causing randomization. Fifty-fifty on a articulate, sunny day, afar subjects tin exist obscured by haze. The best way to cutting through that haze is to apply a polarizing filter.
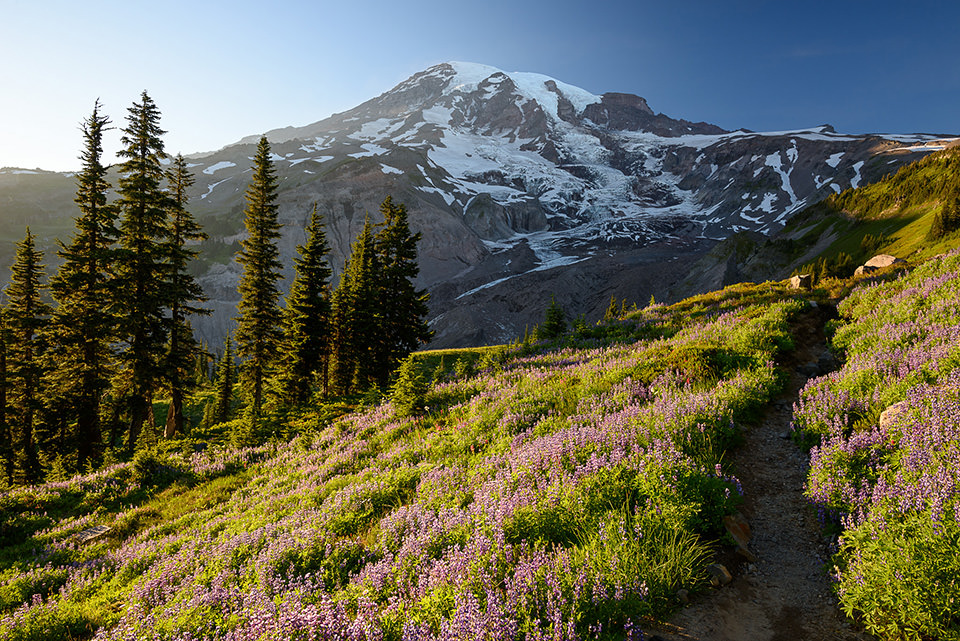
NIKON Z 7 + 85mm f/1.viii S @ 85mm, ISO 64, 1/5, f/5.6
Just like atmospheric particles randomize lite, so do cogitating surfaces. Using a polarizing filter can increase color saturation in your images by reducing reflections from water, glass, leaves, and other non-metal surfaces. Additionally, using a polarizing filter helps you create deep blueish skies in your images. Blue lite waves are shorter than red and green waves, causing them to scatter more easily. Polarizing your view of the sky volition prevent randomized blue low-cal from coming into your lens, leaving y'all with the purest blue light possible.
Polarization can vary greatly depending on the celestial position of the sun, and then information technology is important to empathise that both times of the day and the time of the year tin impact the amount of polarization ane can obtain from a polarizing filter.
When to Use a Polarizing Filter for Best Results
Nosotros put together a detailed guide on polarizing filters, which you can watch beneath:
Types of Polarizing Filters
At that place are 2 types of polarizing filters bachelor on the market today: linear and circular. These types do non refer to the shape of the polarizing filter, but rather to the way lightwaves are modified every bit they pass through the filter. Linear polarizers accept a single polarizing layer and are known to crusade mirrors to cross-polarize on SLR and DSLR cameras, resulting in metering and autofocus issues. Circular polarizers (also known as "CPL"), on the other hand, take a second quarter-wave layer that repolarizes the light, which makes it safe to use on any classic or modernistic digital photographic camera. The only downside of a round polarizer is reduced low-cal transmission when compared to a linear polarizer.
Due to the popularity of DSLR cameras, the need for linear polarizers plummeted over fourth dimension, causing filter manufacturers to concentrate on primarily making circular polarizers – from cheap, poorly-coated filters, to high-quality multi-coated round polarizers with superb calorie-free transmission qualities. Although linear polarizers are withal available today and work just fine on modern mirrorless cameras, they are non recommended for apply due to the unavailability of high-quality options.
Filter Shapes
Both linear and round polarizers come up in unlike shapes and forms. The nearly common shape of a polarizing filter is round, which is designed to be screwed onto a filter thread of lenses that have them. Circular filters can be used on filter holders, as well as lenses with drib-in filter holders. A circular polarizer is very easy to employ. One time it is attached to the front of the lens, it can exist rotated either clockwise or counter-clockwise to increase or subtract the effect of polarization.
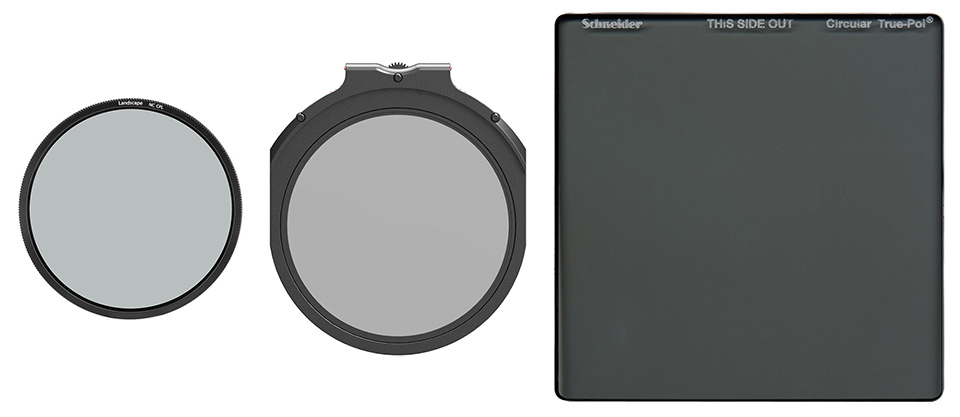
You might likewise meet rectangular polarizing filters. The original purpose of rectangular filters was for filter holder use. Such filters are becoming less common since many filter manufacturers have been able to modify their filter holders to accommodate larger, circular filters instead.
Lastly, some manufacturers might even sell drop-in polarizing filters that are specifically fabricated to fit a item blazon of filter holder. The one pictured above allows photographers to easily rotate the polarizing filter using the dial on its top.
The Importance of a Polarizing Filter in Landscape Photography
Due to the fact that sunlight gets bounced all over the atmosphere and objects nowadays in a mural, eventually making its way into your camera at specific angles, your landscape photographs might end up looking rather dull and lifeless. Once attached to the front of a lens and rotated to a particular angle, a polarizing filter is capable of cutting out most of the reflected light in a scene, instantly enhancing your photographs by increasing their color saturation and contrast.
GFX 100 + GF23mmF4 R LM WR @ 23mm, ISO 100, i/20, f/16.0
When photographing distant subjects such as mountains, a polarizing filter can also assistance in reducing atmospheric haze, as explained further down below. So if you are wondering how some photographers manage to go rich colors in their photographs, particularly when it comes to the sky, leafage, and distant subjects, yous will find that they oft heavily rely on polarizing filters. Although colour can certainly exist added to photographs in post-processing, the upshot of a polarizing filter cannot be fully replicated in software, especially when information technology comes to reducing reflections and haze in a scene, making the filter indispensable for landscape photography.
Maximum Degree of Polarization
The maximum degree of polarization occurs in a circular band 90° from the sun, so information technology is relatively easy to pinpoint exactly where the sky will appear at its darkest in your photographs. A unproblematic pull a fast one on is to form a pistol with your alphabetize and thumb fingers, then point your index finger straight at the sunday. Now rotate your thumb clockwise or counter-clockwise (while keeping your alphabetize finger directed at the sun). The parts of the heaven where your pollex points towards are going to accept the maximum caste of polarization, as they are at the right angle from the sun. This ways that when the sun is directly overhead shut to the zenith, the sky will be polarized horizontally, making the heaven appear more or less even in all directions. Have a await at the beneath photo taken at high noon:
NIKON D750 + 15-30mm f/two.8 @ 15mm, ISO 100, ane/250, f/11.0
On the other hand, when the sun is closer to the horizon at sunrise and sunset times, the sky will be polarized mostly vertically. This can present issues when photographing landscapes with a wide-angle lens, since the more polarized areas of the heaven will be visible in the frame, as shown beneath:
NIKON D810 + 20mm f/i.eight @ 20mm, ISO 100, 1/10, f/eleven.0
With the dominicus ascent from the left of the frame, information technology is very clear that the right side of the sky in the paradigm above is where the maximum degree of polarization is, making that particular part of the sky much darker compared to the left. Such situations are commonly encountered when photographing landscapes at the gilt hour, and so one must be conscientious when using a polarizing filter, especially when shooting with a broad-bending lens. In some cases, it might be helpful to switch to a telephoto lens and concentrate on a much smaller area of the scene, effectively concealing the uneven sky.
Here is a more extreme example of the same problem actualization at dusk:
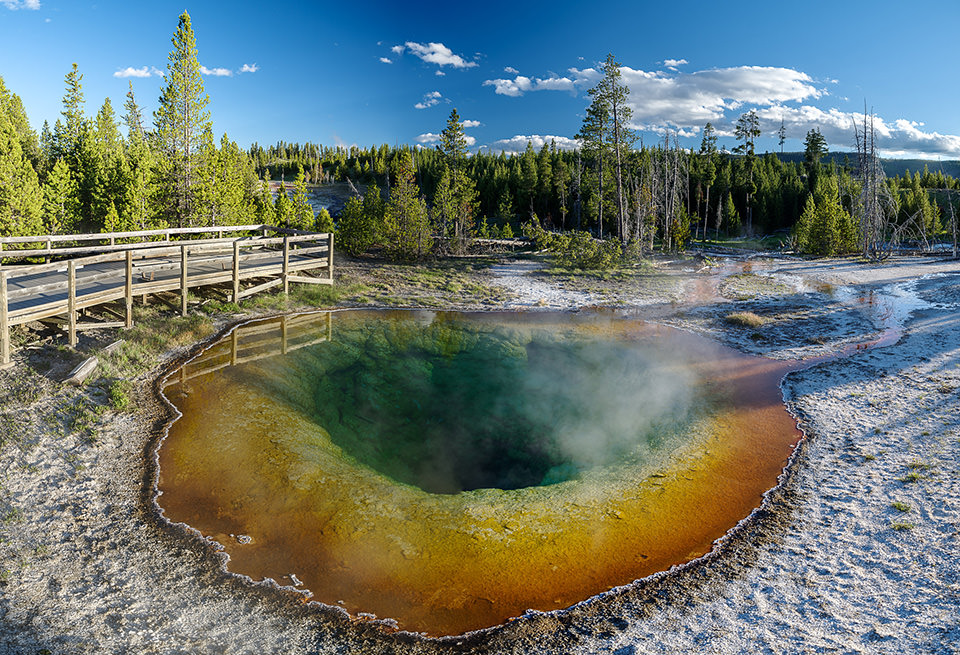
PENTAX M-one + 24-70mm f/2.8 @ 24mm, ISO 200, 1/125, f/4.5
Due to my proximity to the Morning Glory hot spring in Yellowstone National Park and lack of an ultra wide-angle lens, I had to shoot a panorama at 24mm focal length, composed of several vertical frames. Once the panorama was stitched in Lightroom, the problem with the polarization in the heaven became very credible. Here, one can clearly encounter that the center of the heaven is where the maximum degree of polarization is – both left and right sides of the frame look much brighter in comparison. This is because the sun was setting on the right side of the frame, which means that the darkest part of the sky would have been vertical, as seen here.
Gradient skies tin can be very hard to bargain with in post-processing, so one must exist very conscientious when using polarizing filters close to sunrise and dusk times, peculiarly when using broad-angle lenses. In many cases, reducing the amount of sky captured in a scene and rotating the polarizing filter to lighten its outcome can be effective, as seen below. However, in some cases where re-framing is not desired, it might be amend to remove the polarizing filter completely to avert capturing gradient skies.
Handling of Unnaturally Nighttime Heaven
When your camera is pointed towards the part of the heaven that has the maximum degree of polarization and the circular polarizing filter is at its strongest point, the sky might appear unnaturally night in images, making it look very fake. In such situations, rotating the filter further and thus reducing the effect of the polarizing filter can take care of the trouble, creating not only a brighter sky but also addressing the potential of having a gradient sky in the photograph. Take a look at the two images below:
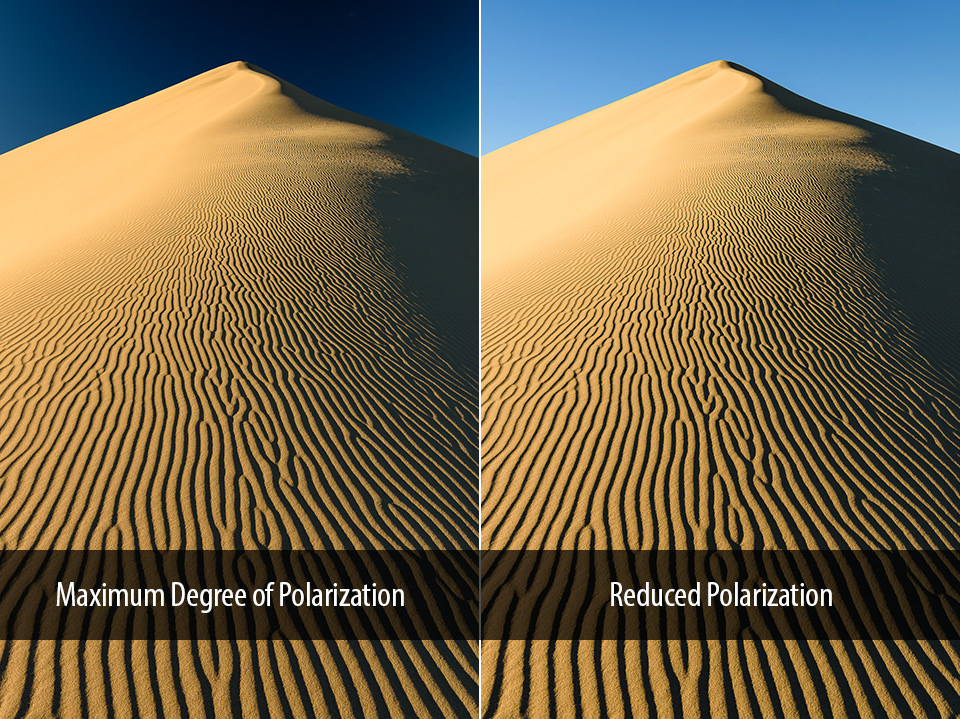
I captured the starting time image with the polarizing filter rotated to yield the maximum polarizing issue, which unnaturally darkened the sky and made information technology appear uneven. To have care of the problem, all I had to practice was rotate the filter until the heaven returned to a much brighter land. Equally you tin can see, the photo on the right looks much improve in comparison, and with just a single turn, I was able to address the issue without having to remove the filter.
Reflection Reduction
One of the chief reasons why photographers employ polarizing filters is to reduce reflections in a scene. Reflections are everywhere around us and they are very common in nature. Aside from mutual h2o reflections originating from ponds and lakes, we might be dealing with window reflections or possibly even tiny reflections of light bouncing off vegetation or rocks surrounding waterfalls. In such situations, using a polarizing filter can help dramatically reduce reflections, fifty-fifty potentially adding contrast and saturation to the epitome. Take a expect at the epitome below:

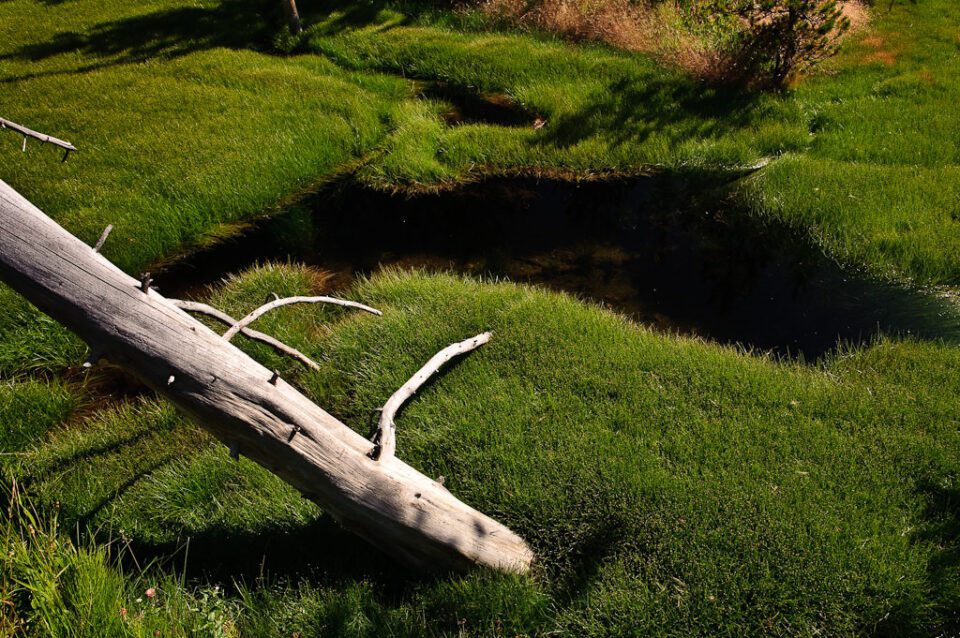
As you can see, the pond was reflecting the sky and the trees in the background into my camera. By using a polarizing filter, I was not merely able to cut down about of the reflections from the pond, but as well reduce the micro reflections coming from the surrounding grass the scene, which inverse the appearance and the color of the glass in the resulting photograph. Such furnishings can never be replicated in post-processing software.
Haze and Contrast Reduction
One of the principal reasons why I personally have a polarizing filter everywhere I go is considering I often rely on it to reduce haze in my images. Brume is something we landscape photographers take to deal with very frequently, so being able to utilize a polarizing filter in such situations helps quite a bit during post-processing since we can take it one step further and reduce haze fifty-fifty more than through various "dehaze" and contrast adjustment tools in the software. Some brume is relatively easy to deal with in mail, but when there is a lot of it, a round polarizing filter can definitely assistance. Take a look at the below epitome comparison:
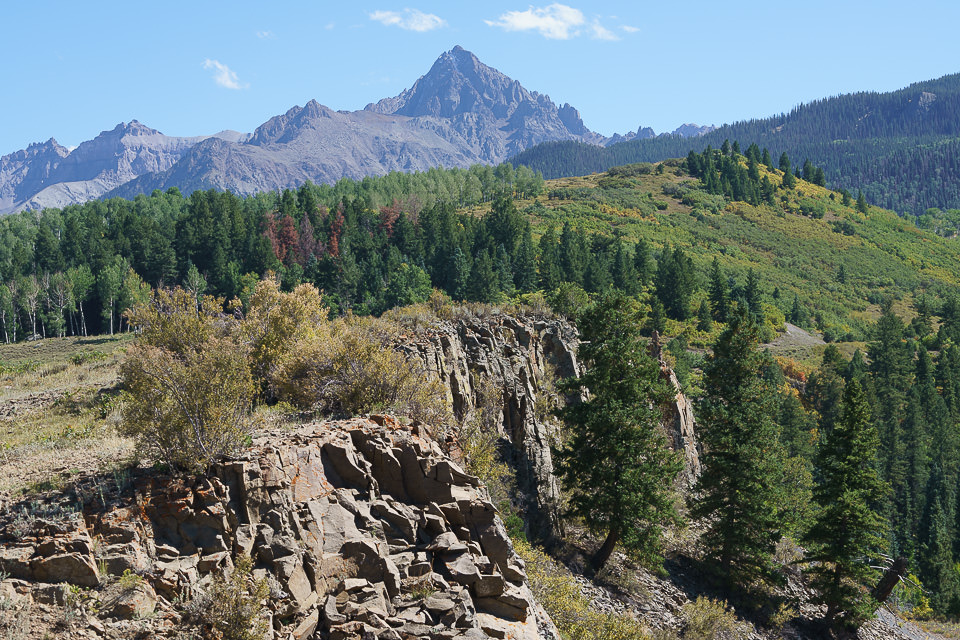
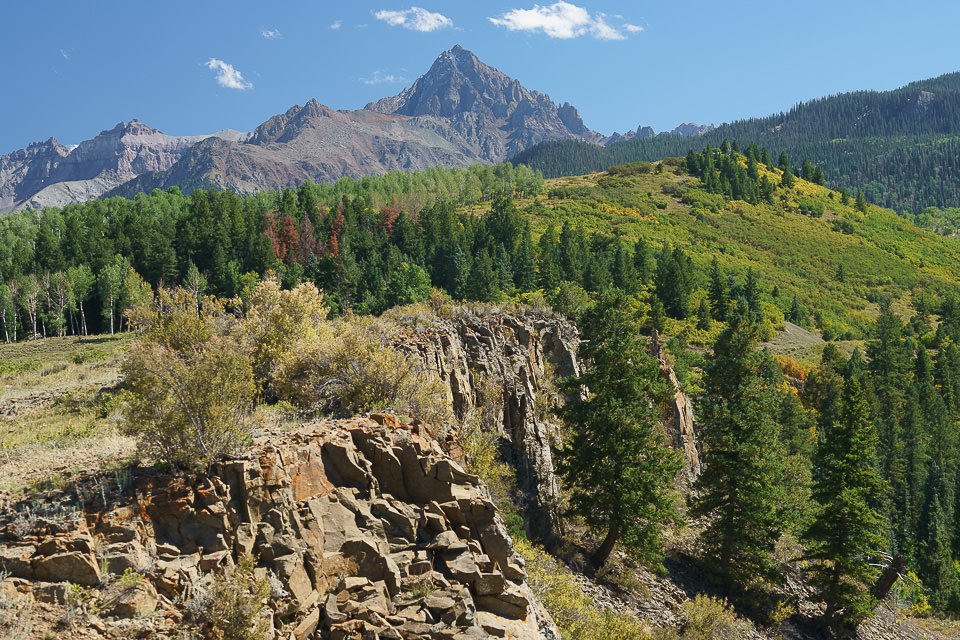
It is very clear that there is a dramatic difference betwixt the two images. Both are "equally is, straight out of the camera", pregnant, I did non apply any post-processing to them. The "Before" image is the 1 I captured before mounting a circular polarizing filter and the "After" paradigm was captured with a polarizing filter attached and rotated to reduce the reflections in the scene.
As you lot tin run into, there are huge differences throughout the image. First, the image with the polarizing filter has significantly less haze in the distant mountains. Second, take a look at the colorful areas of the image: the reds and the yellows appear much more saturated. Note how the evergreens appear completely different, looking greener and lighter in comparison. This is all the result of reduced reflections in the temper and reduced reflections originating from objects in the scene. Without a polarizing filter, the greens announced "dirty", giving evergreens a much darker and uglier tone.
Lastly, notation the difference in the sky – the clouds announced to pop out much more and the sky looks a flake more saturated and darker. This is something you lot could never replicate in mail service! The prototype went from "bland and lifeless", to "colorful and natural" by just using a polarizing filter.
The only downside hither is the slope sky introduced by the polarizer (y'all could tell it was early in the morning), merely with a couple of simple techniques in software, I tin address such issues very easily. But by using a graduated filter tool in Lightroom, along with a couple of small tweaks, I was able to make my image wait even better:
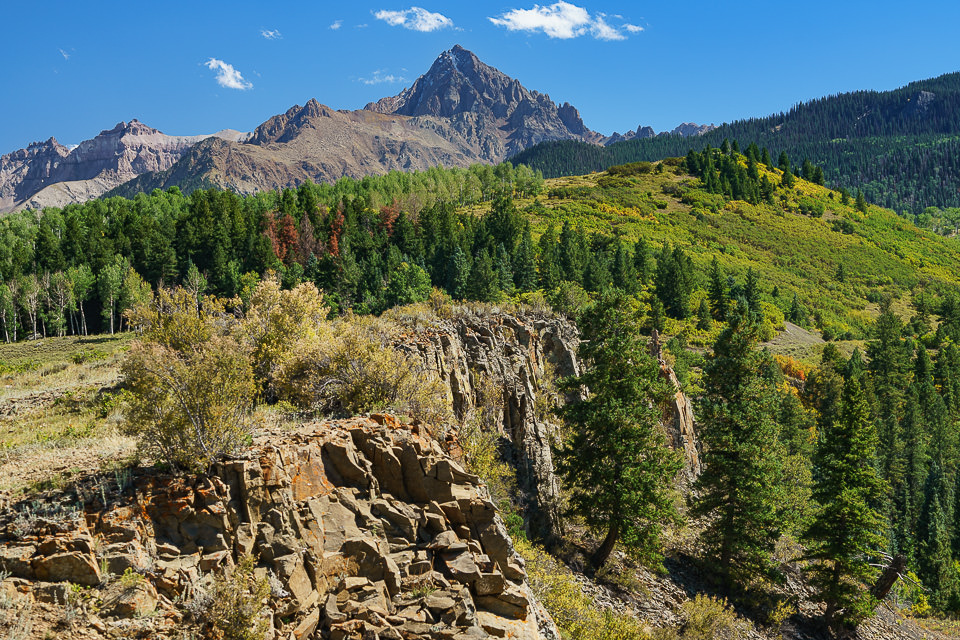
If I had non used a circular polarizing filter, information technology would have taken me a meaning amount of time to try to replicate these changes in Photoshop and I am adequately confident that the upshot would not even come shut in comparison.
Color Enhancement
The aforementioned goes for photographing waterfalls and foliage – a polarizing filter in such cases can be invaluable. The beneath image would have looked vastly unlike without a polarizing filter:
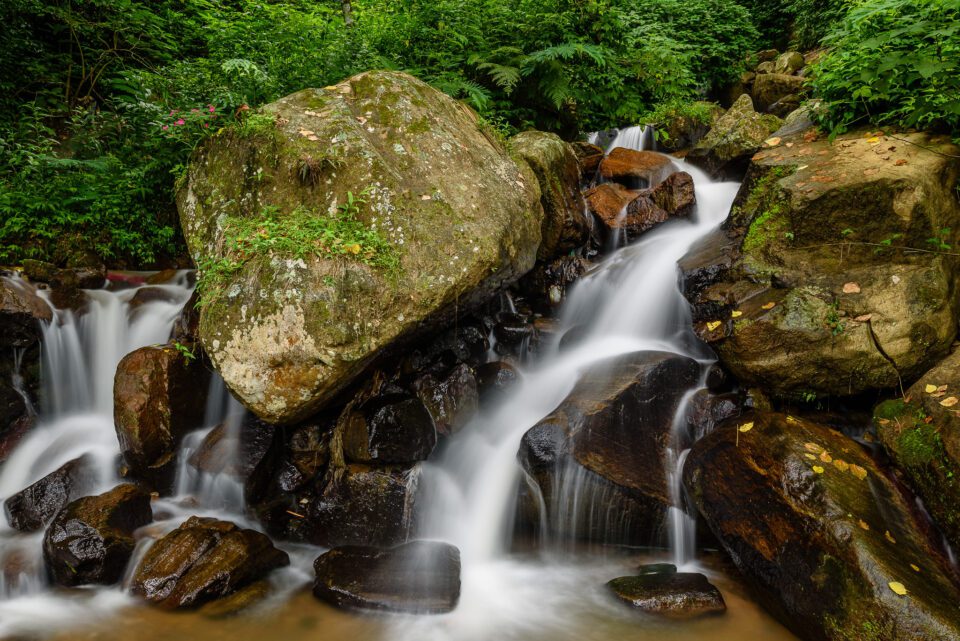
NIKON D750 + 24mm f/ane.4 @ 24mm, ISO 50, v/i, f/11.0
When photographing waterfalls, you deal with highly reflective rocks, since they have h2o and other wet vegetation on them, all of which send nasty reflections right into your camera. A polarizing filter makes a huge deviation in such situations, not only significantly cutting downward on those reflections, but also increasing the overall saturation and dissimilarity of the image.
Hither is another example of fall leaf captured with a polarizing filter:

Catechism EOS 5D Mark Iv + EF24-70mm f/4L IS USM @ 39mm, ISO 200, 1/4, f/8.0
How to Improve Cityscapes with a Polarizing Filter
1 of the easiest means to essentially improve the image quality of your daytime cityscapes is to use a circular polarizing filter. Using a polarizing filter is critical when photographing subjects that are ane or more miles away. The longer the distance, the more than critical it is to polarize the light you are capturing. For example, this prototype of Dubai skyline was captured from a vantage point that was over a mile abroad:
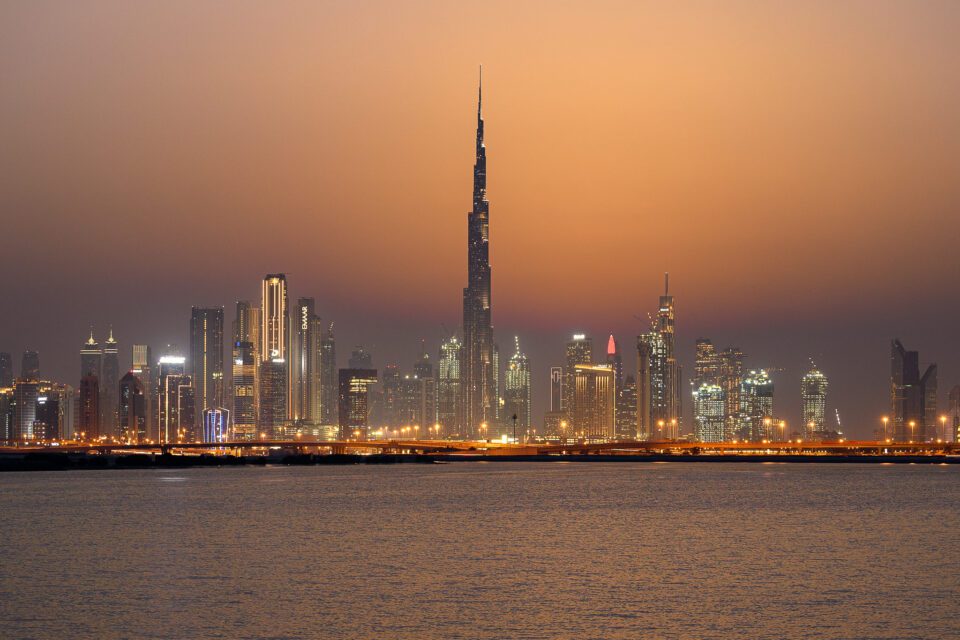
NIKON Z 50 + NIKKOR Z DX 50-250mm f/4.5-half dozen.3 VR @ 50mm, ISO 100, 2.5 sec, f/v.6
Although in that location is notwithstanding some haze and softness visible in the image (especially when looking at distant buildings), it would take been an unusable image without a polarizer. I was able to cut down nearly of the fog and haze in this prototype.
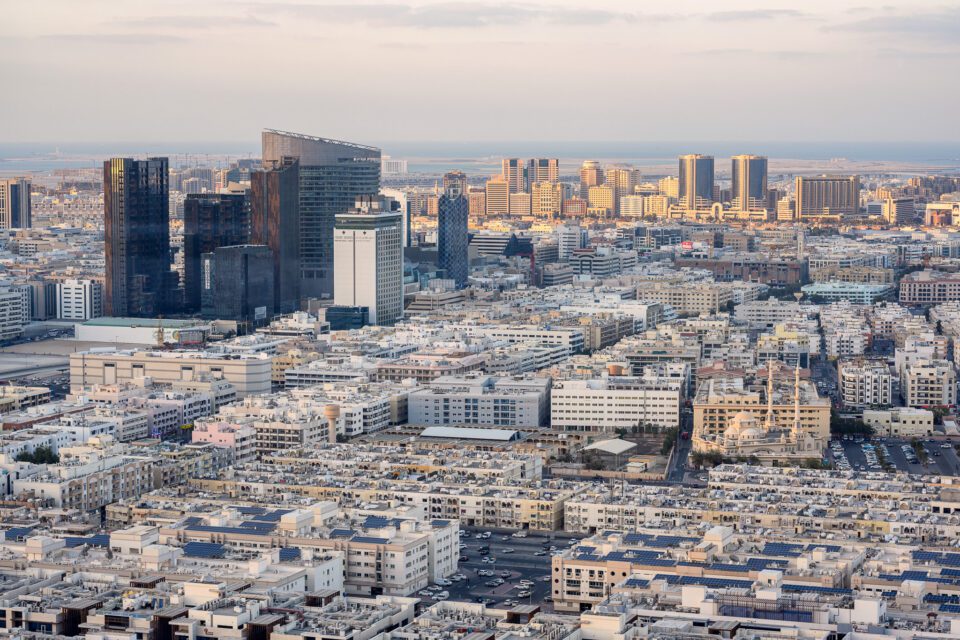
Even if you take buildings that are fairly shut, a polarizing filter can help reduce brume and meliorate the clarity of distant buildings and subjects. Accept a look at the below epitome of Hagia Sophia:

NIKON Z 7 + 85mm f/1.8 South @ 85mm, ISO 64, 4/ten, f/8.0
As yous can see, Hagia Sophia is relatively close, but the distant hills in the back are quite far, so they looked quite hazy. By using a polarizing filter, I was able to cut down the haze and better the dissimilarity of the groundwork.
The only matter you lot have to watch out when photographing cityscapes is flare, especially if you are using a poor-quality polarizing filter, or if the filter is non very clean. When capturing the below prototype of Burj Khalifa, I noticed that I had some flare when using my polarizer.
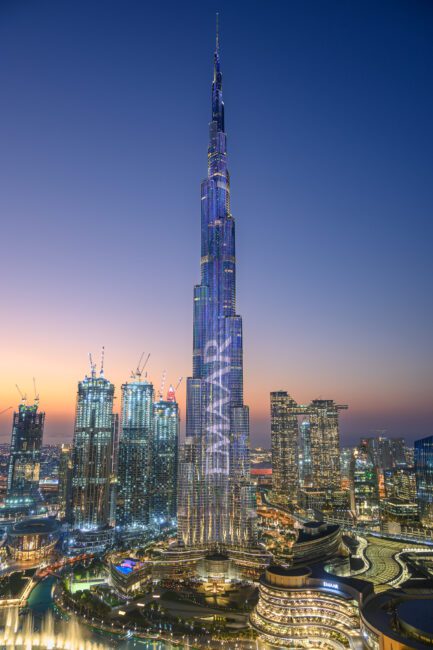
NIKON Z 50 + xvi-50mm f/3.5-vi.3 VR @ 16mm, ISO 100, two sec, f/five.half dozen
When I removed information technology from the lens and looked at information technology, the filter was quite dirty. After cleaning upward the filter and mounting it dorsum on the lens, the flare issues went away.
Another potential use of a polarizing filter is when you shoot through the drinking glass of a building or a helicopter. Take a look at the below image:
NIKON Z 7 + 85mm f/ane.8 South @ 85mm, ISO 64, one/25, f/5.6
I captured this image from the Dubai Frame. It was tough to shoot through the thick glass with all kinds of reflections (they use all kinds of LED lights inside), and then a polarizing filter was basically a necessity. Once I rotated the filter and cut down most of the reflections, I was able to walk abroad with another usable image.
And here is an image of the New York skyline that I was able to capture through a helicopter window:
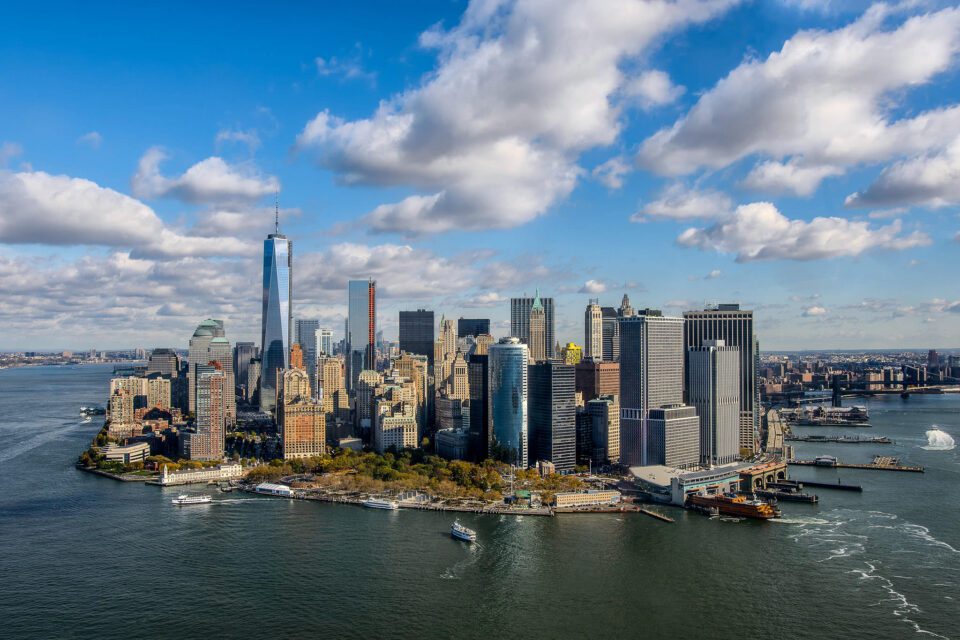
NIKON D800E + 18-35mm f/1.eight @ 20mm, ISO 100, 1/800, f/5.6
Once again, a polarizing filter was necessary to reduce internal reflections and better the overall dissimilarity of the scene.
Disadvantages
Unfortunately, polarizing filters do come up with a set of disadvantages and problems. Here are a few other things yous be aware of:
- Polarizing filters can mess upward the heaven: every bit explained earlier in this commodity, using a polarizing filter on a broad-bending lens nigh sunrise and sunset times tin can potentially make your sky appear gradient and uneven. The same goes for panoramas – be extra careful when shooting panoramas, as y'all could finish up with a sky that is very hard to gear up in post-processing.
- Polarizing filters require more than fourth dimension to gear up up and use: when taking pictures with a polarizing filter, one has to pay a bit more than attention to the motion-picture show-taking procedure since circular polarizers require adjustment each time framing changes significantly, as the effect of the polarizing filter varies profoundly depending on the position of the lord's day and the management of the camera. Also, sometimes it is difficult to see changes in the viewfinder when rotating circular polarizing filters, particularly when using cameras with smaller viewfinders.
- Polarizing filters steal light: one of the chief disadvantages of polarizing filters is that they reduce the amount of lite entering your lens. Some filters are worse than others in this regard, but in general, you can expect polarizing filters to decrease your exposure time by 1-3 stops. Highest quality B+W filters typically block very piddling calorie-free between 1-1.v stops, merely some older and poor quality polarizing filters can bring your shutter speed down by 3+ stops, which is pregnant. For this reason lonely, polarizing filters should be used sparingly, only when they are needed.
- High-quality polarizing filters are expensive: depending on the size of the filter, the quality of drinking glass, multi-resistant coatings and brand, high-quality polarizing filters tin can be quite expensive, especially if you desire to buy a polarizer for each filter size you accept. Instead of buying many different size filters, my recommendation is to buy 1 filter (pick the largest filter thread size you accept) and for all other lenses you have, go much cheaper stride-up rings. This way, you lot can easily apply the same filter on different lenses. It might have more time to set up in the field, simply you won't have to pay hundreds of dollars to get CPL filters on all your lenses.
- Polarizing filters can add together more than ghosting and flare to images: since it is another piece of glass in front of your lens, at that place is always a potential to encounter more ghosting and flare in your photographs, especially when using a cheap quality polarizing filter. Additionally, yous must ever make sure to keep both your lens front end element and your polarizing filter clean, as dust particles and other debris could add to more than internal reflections, reducing both contrast and image quality of your photographs.
- Polarizing filters tin can add together vignetting: when using polarizing filters with some wide-bending lenses, you might see noticeable vignetting in the corners of the frame. To avoid vignetting issues, we recommend non to stack filters and but purchase "slim" or "nano" type polarizing filters, which are much thinner compared to full-size polarizing filters (please note that some thinner filters tin make information technology difficult to use lens caps). Also, I do not recommend using step-downwardly rings due to the aforementioned vignetting concerns.
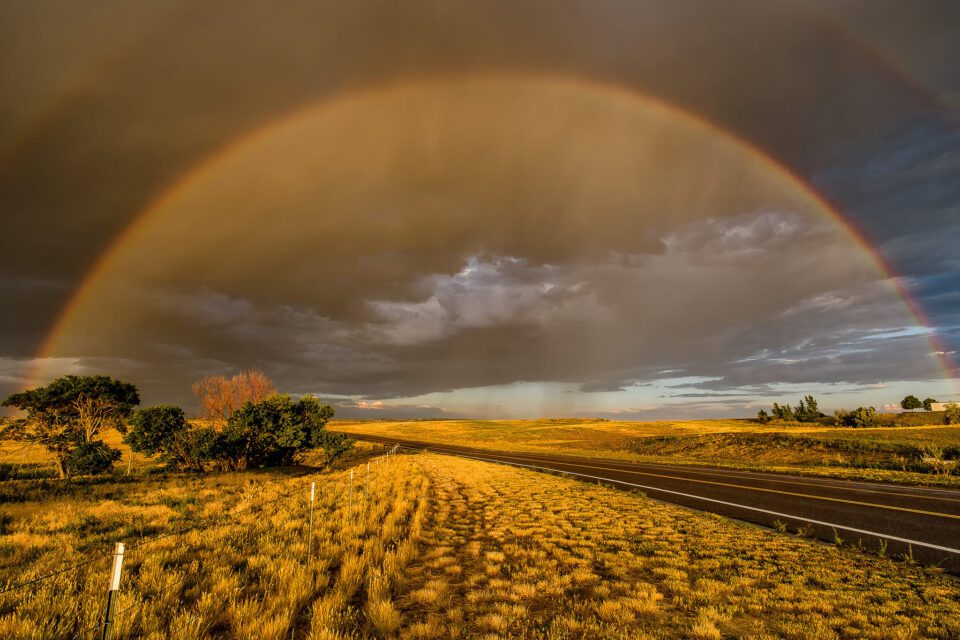
- Be careful when shooting rainbows: although a polarizing filter can help boost rainbows in your images, if y'all are not very careful and you lot over-rotate it, yous might stop up completely eliminating the rainbow in your epitome! My recommendation would exist to use live view, zoom in a little and look at the rainbow as you rotate the polarizing filter – finish when it looks most pronounced.
Recommendations
I personally apply and highly recommend the B+W 77mm XS-Pro Kaeseman Circular Polarizing MRC Nano filter, considering of its top-notch optics, small footprint and very fiddling light loss of 1-1.5 stops, but there are many other loftier-quality polarizing filters available on the market today – some cheaper, others more than expensive. Delight make sure to only buy high-quality polarizing filters – you practise not desire to put a cheap slice of glass in front of your expensive lens, only to be after disappointed past the poor epitome quality and unwanted ghosting and flare. Bad quality filters are not worth wasting your money and time on!
Conclusion
Overall, a polarizing filter is a must-have tool in every lensman'south pocketbook. Ane of the challenges of being a photographer is making the all-time of the calorie-free you have available to you lot. Polarizers give you the ability to control the low-cal that comes through your lens, creating vibrant images that might otherwise await dull.
Equally yous tin can see from this article, a polarizer is not just something that can help raise the color of the sky – it is a much more versatile tool that tin reduce reflections and haze, and effectively boost both colors and contrast in your images. A polarizing filter is not something you want to go out on your lenses at all times though since it reduces low-cal transmission and information technology tin potentially make the sky await unevenly gradient when using broad-angle lenses. High-quality circular polarizing filters can also exist rather expensive to buy and can take some fourth dimension to become used to. However, those are small disadvantages compared to the benefits they bring.

A Vertical Polarizing Filter Is Used On The Lens Of A Camera. Which Waves Do Not Strike The Lens?,
Source: https://photographylife.com/definition/polarizing-filter
Posted by: williamsgeonsely.blogspot.com
0 Response to "A Vertical Polarizing Filter Is Used On The Lens Of A Camera. Which Waves Do Not Strike The Lens?"
Post a Comment